FAQs
When the default instance of the database is used by other application, how do I install the database using the named instance?
The installation procedure is similar to the installation procedure for using the default instance. The following information describes only the differences. For information about other steps, see "Installing SQL Server 2008 R2." After the Setup Support Rules check is complete, click Next to enter the Installation Type page, as shown in Figure 59.
Figure 59: Installation Type page
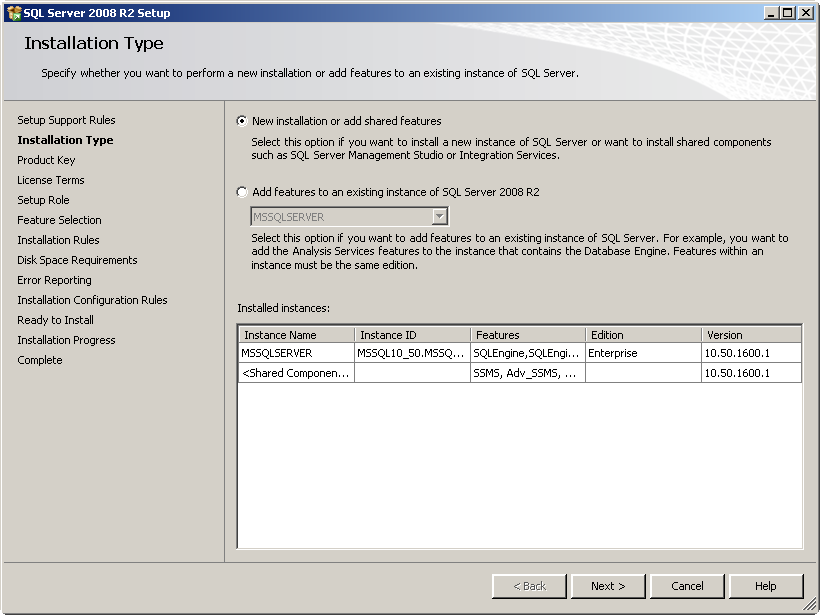
Select New installation or add shared features and click Next. Enter the product key, agree with the license terms, and select the setup role. The Feature Selection page opens, as shown in Figure 60.
Figure 60: Feature Selection page

Select the features as shown in Figure 60, and then click Next. The Instance Configuration page opens, as shown in Figure 61.
Figure 61: Instance Configuration page
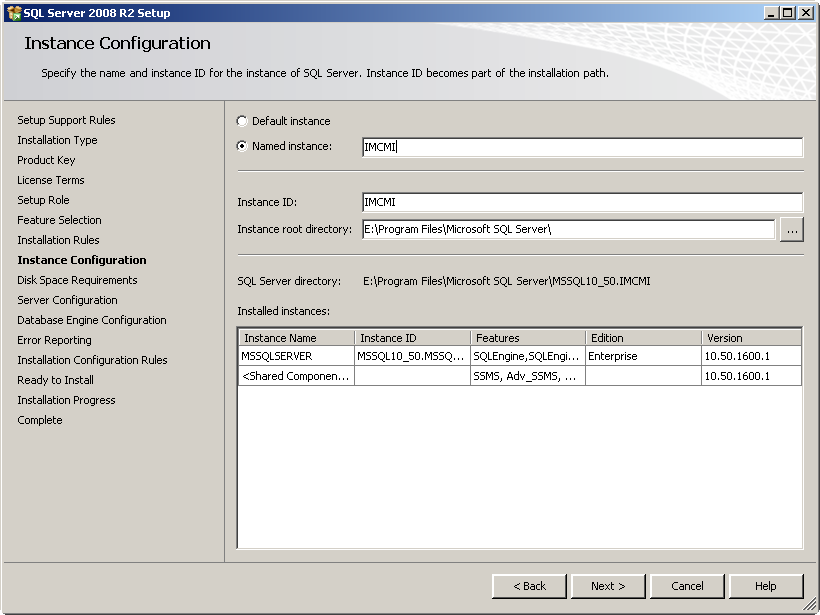
Select Named instance, and enter an instance name. Set the Instance root directory. Click Next to enter the Server Configuration page, as shown in Figure 62.
Figure 62: Server Configuration
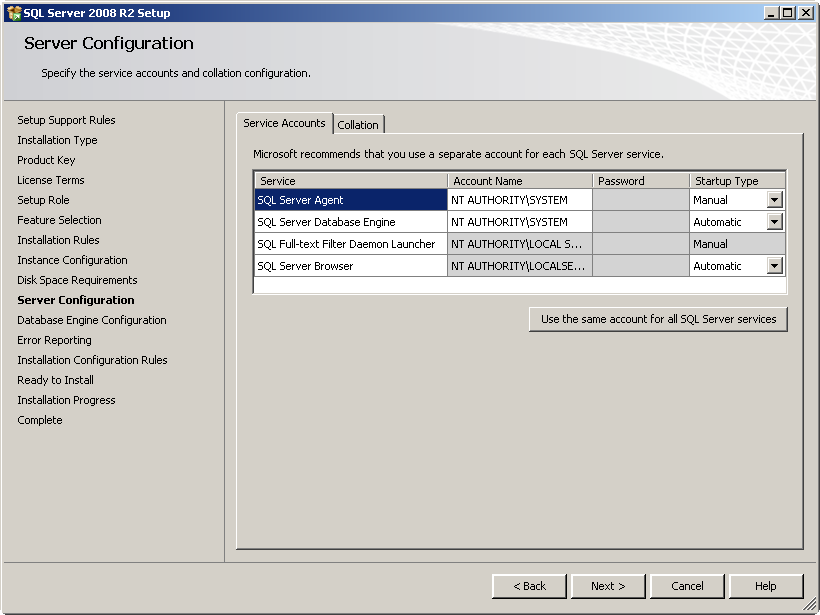
Set the account name as shown in Figure 62. Click Next to enter the Database Engine Configuration page, as shown in Figure 63.
Figure 63: Database Engine Configuration page
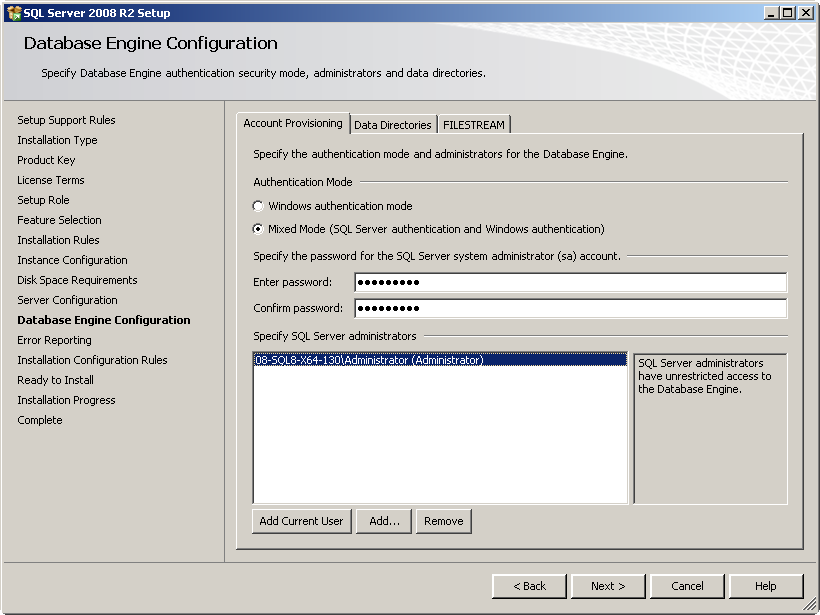
Configure the Authentication Mode as Mixed Mode and enter the password of user sa. Make sure the password does not contain the following characters: < > | \t.
Use the default settings on the Data Directions and FILESTREAM tabs.
The following setup is the same as the setup when the default instance is used.
Does changing the computer name affect the database? How do I restore the database?
Changing a computer name might cause some SQL Server database failures.
In this case, perform the following operations to update the computer name saved in the database:
Suppose the old computer name is SERVER_1 and the new one is SERVER_2. Open cmd.exe in Windows and execute the following scripts (assuming that the login user name is sa and the password is iMCpass):
osql -Usa -PIMCpass
select @@SERVERNAME
go
The old computer name SERVER_1 is displayed on the interface.
Continue to execute the following commands to modify the computer name saved in the database:
sp_dropserver @server=‘SERVER_1’, @droplogins=NULL
go
sp_addserver @server=‘SERVER_2’, @local='local', @duplicate_ok= 'duplicate_OK'
go
exit
The commands above first deletes the old computer name SERVER_1 and then adds a new one SERVER_2.
After the modification above, you must restart the SQL Server service in the Windows Service Manager to restore the database.
During the IMC installation, the following message is displayed: MS SQLServer Is not Installed Correctly, MSSOLSERVER Service Does not Exist. How do I resolve the issue?
MSSQLSERVER is the default instance name of the Microsoft SQL Server. Displaying MSSQLSERVER means you have selected the default instance. If you do not select the default instance but specify an instance name ABC, MSSQL$ABC is displayed. To view the correct instance name, make sure the default instance or the specified instance name exists in the SQL Server Configuration Manager.
During the IMC installation, the following message is displayed: Database Service MSSQLSERVER Is not Configured to Be Started with Local System. How do I resolve the issue?
During the installation, IMC requires its own database file to be created. If the MSSQLSERVER service is not configured to run as the Local System, IMC fails to be installed because of the disk access restriction. To resolve the issue:
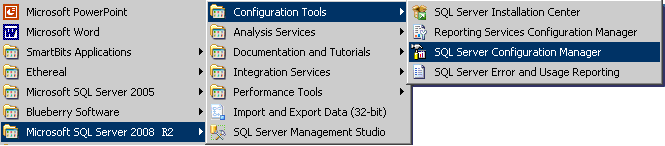
Select Start > All Programs > Microsoft SQL Server 2008 R2 > Configuration Tools > SQL Server Configuration Manager as shown in Figure 64.
Figure 64: Launching the SQL Server Configuration Manager
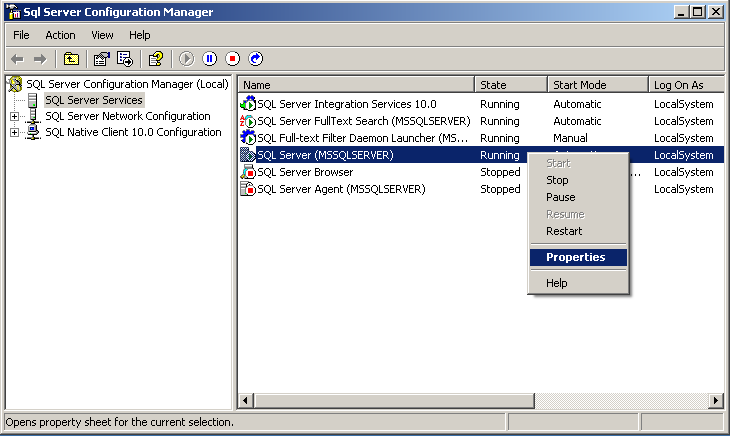
Right-click SQL Server (MSSQLSERVER) on the SQL Server Configuration Manager and select Properties, as shown in Figure 65.
Figure 65: SQL Server Configuration Manager
On the SQL Server (MSSQLSERVER) Properties page, click Built-in account, select Local System from the list, and then click OK, as shown in Figure 66.
Figure 66: SQL Server (MSSQLSERVER) Properties page
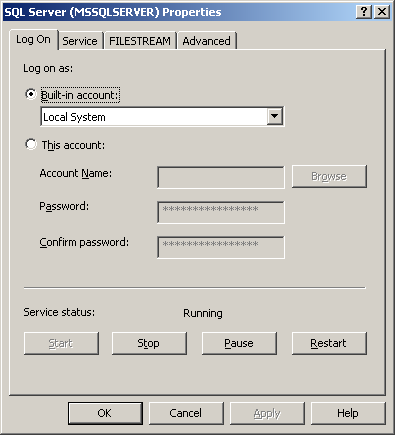
After completing the preceding configurations, you must restart the SQL Server (MSSQLSERVER) service on the SQL Server Configuration Manager page. After that, configurations take effect.
During the IMC installation, the following message is displayed: The ADO1.5 Component Is not Found in Current System. How do I resolve the issue?
IMC uses ADO 1.5 to connect the database. ADO 1.5 is provided by the operating system. This error indicates that ADO 1.5 is corrupted. To resolve the issue, re-install ADO.
During the IMC installation, the following message is displayed: Provider Cannot Be Found. How do I resolve the issue?
This error means that MDAC is not installed on the server or that your MDAC installation is corrupted. MDAC corruption usually occurs when some application programs erroneously attempt to install a partial version of MDAC.
To resolve the issue, download the installation program mdac_typ.exe from Microsoft's website to re-install MDAC. If MDAC installation fails, do the following:
In Windows Explorer, open the C:\WINDOWS\inf folder. This folder might be hidden.
Right-click the mdac.inf file in the folder and select Install. You can select each file from Service Pack CD-ROM, or from the current operating system.
To select files from Service Pack CD-ROM, locate the i386 directory on the CD-ROM drive. For example, if the CD-ROM drive is D:, select the D:\i386 directory.
To select files from the current operating system, click Browse, select a file, and then click Retry.
MDAC is installed successfully if no error is displayed after you complete the installation.
Files to be located during the installation and their locations are as follows:
File name: adcjavas.inc
Location: C:\Program Files\Common Files\System\msadc
File name: adojavas.inc
Location: C:\Program Files\Common Files\System\ado
·File name: msdadc.dll
·Location: C:\Program Files\Common Files\System\ole db
·File name: dao360.dll
·Location: C:\Program Files\Common Files\Microsoft shared\dao
·File name: handler.reg
·Location: C:\Program Files\Common Files\System\msadc
·File name: oledbjvs.inc
·Location: C:\Program Files\Common Files\System\ole db
·File name: MDACRdMe.htm
·Location: If you cannot find the MDACRdMe.htm, change the name of the file MDACReadme.htm to MDACRdMe.htm.
Reboot the operating system.
If the problem persists, you can use the MDAC Component Checker provided by Microsoft to locate MDAC installation problems.
Download a free MDAC Component Checker, cc_pkg.exe from the Microsoft website
Decompress it to the C:\ComponentChecker directory.
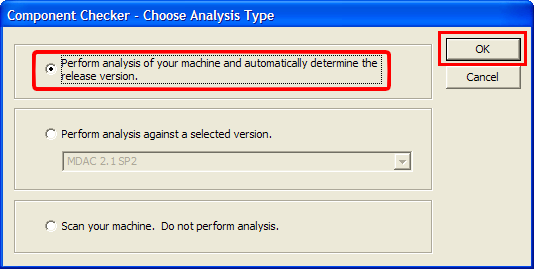
In the Component Checker dialog box, select Perform analysis of your machine and automatically determine the release version, and click OK.
Figure 67: Component Checker page
After a short time analysis, mismatch information is displayed, as shown in Figure 68.
View the information about MISMATCH under File Details. The MISMATCH information indicates the potential problems of the MDAC installation.
Figure 68: Viewing MISMATCH information under the File Details node
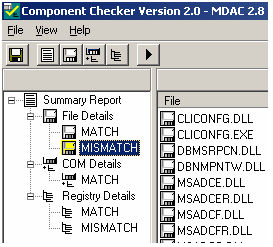
Click MISMATCH and view files in the right pane. These file versions are different from the MDAC version. The Mismatch Field column displays expected file versions. The File Version column displays actual file versions.
When version mismatch cannot be solved through MDAC installation, you must copy files to the corresponding directories.
Locate the mdacxpak.cab file from the depressed path of MDAC_TYPE.exe and use WinZip to decompress the mdacxpak.cab file. The file contains most of the important MDAC files.
Copy the depressed files to corresponding paths shown in MISMATCH.
Reboot the operating system.
If you still cannot resolve the issue, re-install your operating system and databases, or contact the technical support department.
During the IMC installation, the following message is displayed: Failed to run bcp.exe, Database tools not installed or Windows not restarted after MS SQL Server installed. How do I resolve the issue?
When you select to use a remote database server, a server the business components are not on, IMC requires a tool such as bcp.exe to access the database. Manually install Connectivity Components client tools on the IMC server. For the detailed installation procedures, see the Feature Selection page in Figure 10.
After installing the Connectivity Components, restart Windows for the client software bcp.exe to take effect.
How can I update database passwords for IMC?
The usernames and passwords used by the IMC modules are stored in cipher text in file \common\conf\ server-addr.xml in the installation path. You can use the pwdmgr.bat command to obtain passwords in clear text or update the latest passwords to the file.
Usually, a user can use the database management tool to change the database password of an IMC module. To ensure communication between IMC and the database, use the pwdmgr.bat command to update the corresponding password in file server-addr.xml. If IMC is deployed in distributed mode, you must update the password for every IMC server, as shown in Figure 69.
Figure 69: Updating database passwords for IMC

In the preceding commands, dbpasswd represents the latest database password of the IMC_config user, config_db represents the database name, and 192.168.20.107 represents the IP address of the database. To obtain the IP address and name of a SQL Server database, view the settings of the corresponding user in file $IMCROOT/common/conf/server-addr.xml.
Why can't I install the SQL server on a Microsoft Gold Standard server?
To install the SQL server on a Microsoft Gold Standard server, make sure you are a system user granted the proper rights to install the SQL server.
Table 1: User right list
Local policy object display name | User right |
|---|---|
Backup files and directories | SeBackupPrivilege |
Debug Programs | SeDebugPrivilege |
Manage auditing and security log | SeSecurityPrivilege |