Configuring Captive Portal on CPPM
Import the HP RADIUS dictionary
For CPPM versions 6.5.*, you must update the HP RADIUS dictionary. To import the dictionary in CPPM, follow these steps:
Go to Administration -> Dictionaries -> RADIUS and click Import.
Select the XML HP RADIUS Dictionary from your Hard Drive.
Click Import.
Create enforcement profiles
![[NOTE: ]](images/note.gif) | NOTE: Create the HPE Bounce Host-Port profile and the Guest Login profile only if they do not already exist. |
For the HPE Bounce Host-Port profile, configure Captive Portal so that the RADIUS CoA message that includes the Port Bounce VSA is sent to force the second RADIUS re-authentication after the user registers their device and makes it known.
In CPPM, go to Configuration -> Enforcement -> Profiles
Click Add.
Enter the Profile Name: HPE Bounce Host-Port
Enter the Description: Custom-defined profile to bounce host port (HPE).
Select the type RADIUS_CoA.
Select the action CoA.
Add all of the attributes required for a CoA message, and specify the port bounce duration (valid values are between 0 and 60). This is the amount of time in seconds the port will be held in the down state. The recommended setting is 12 seconds.
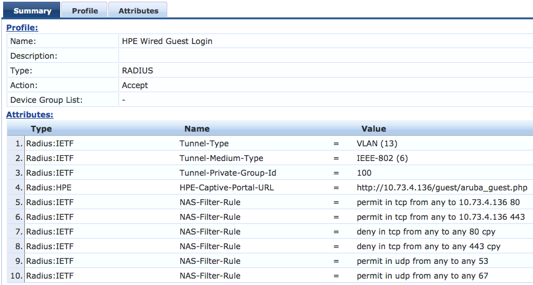
Repeat Step 2 to Step 6 to configure the Guest Login profile that will be sent as part of the first RADIUS Access-Accept and enforce the redirect to the Captive Portal on CPPM. For this profile, select RADIUS as the type and Accept as the action.
Add all of the NAS-Filter-Rule attributes specified below, replacing the IP address in the first two NAS-Filter-Rule attributes with your CPPM address. Add the HPE-Captive-Portal-URL attribute to specify the redirect URL, replacing the IP address with your CPPM address. This will cause the client to be redirected to the Captive Portal on CPPM. You can add other attributes, such as a VLAN to isolate onboarding clients, or a rate limit to help prevent DoS attacks.
![[NOTE: ]](images/note.gif)
NOTE: The
HPE-Captive-Portal-URLvalue must be a URL normalized string. The scheme and host must be in lower case, for examplehttp://www.example.com/


